New terms from treehouse – Customizing the WordPress Admin Area – Admin Color Schemes, Customizing the WordPress Login Screen, Controlling Admin Navigation in WordPress, and Custom Dashboard Widgets in WordPress

Admin Color Schemes

What are Admin Color Schemes?

Color schemes are skins that style what the admin area looks like. It’s basically a css file. You can make it so each user can choose their own, or override it so everyone sees the same one.

If you go to Users > click on one, you’ll see some default schemes to choose from.

Screen Shot 2014-12-31 at 4.06.12 PM


Customizing Admin Color Schemes via a Plugin

Admin Color Schemes simply gives you a bunch extra to choose from.

Admin Color Schemer lets you create your own custom color scheme on the fly using color pickers. After you install it, you can find it under Tools > Admin Colors. Once you’re done, you can save and use it, and you’ll also find it in the Users option with the others.


Customizing Admin Color Schemes from Scratch

Start by making a child theme with the style.css and funtions.php files.

If you go to the root WP folder > wp-admin > css > colors, you’ll see each color scheme as a folder there. The colors-rtl.css file is for people whose languages read right to left. We’ll open the colors.css file, and copy its contents.

Screen Shot 2014-12-31 at 4.14.15 PM

Next, go back to your child theme, and make a folder called admin-colors, and inside that, make a folder for each theme color you want to have, and paste in the colors.css. To tell WP we now have a new color and we want it to appear in the admin area, we can use the wp_admin_css_color function in functions.php.

First, create a name-scaped function, in this case called wpt_admin_color_schemes. Set the theme directory to a variable, then the wp_admin_css_color function, which takes some parameters. The first is its short name, the next is it’s translatable full name, then the link to the folder where it can be found, then finally an array of hex values to appear as the four color options when viewing this in the admin option color select section.

Finally, you use add_action to call the function during admin_init, which is as soon as the admin area is initialized.

Screen Shot 2014-12-31 at 4.23.24 PM

To change the colors, go into the colors.css file and do a find and replace for the corresponding colors. So if we inspect element for the ectoplasm color scheme that ours is based on, we can find and replace that with the corresponding colors from our array.

Screen Shot 2014-12-31 at 4.24.55 PM

Screen Shot 2014-12-31 at 4.25.39 PM

To ensure that a certain user can only have one applied, you’d add a conditional statement within your wp_admin_css_color function based on the user.


Customizing the WordPress Login Screen

Customizing the WordPress Login Screen

For when you go to site.com/wp_admin. This lets you build a custom branded site for your client.


How to Customize the WordPress Login Screen via functions.php

Here’s what the default log in screen looks like.

Screen Shot 2014-12-31 at 4.32.55 PM

Here’s a link to the codex page on customizing this. The code will go inside your funcitons.php file. It starts with how to replace the logo, then how to add your own css file for it. You’d really just enqueue them in the same way you would for the main site. They also give you some highly helpful/specific classes you’ll need for this.

You can also add in some login hooks for things like errors. Note that you don’t just find and copy a file here, or need to take the child theme approach.


How to Customize the WordPress Login Screen Using a Plugin

Plugins make customizing the login form a lot easier. Custom Login is a good one for this. After installing it, you’ll find it under Settings > Custom Login. First, you should activate it, and put in a background color to test it. Log out and see if it worked. You can also set a background image.

You can easily upload a logo and customize the settings for it. Note that for the logo, a lot of the heights are hard coded in, so it’s often better to upload a file with the dimensions you need rather than try changing them in this form.

Screen Shot 2014-12-31 at 4.42.18 PM

You can customize the login form as well. You can also paste in any custom html, css or jQuery you’d like to use, right in the form.


Controlling Admin Navigation in WordPress

How and Why to Change Admin Navigation in WordPress

Your end user might not need to see or use all the options here, so it’s a good idea to remove those.


How to Remove and Add Admin Menu Links via the functions.php File

Note that the user level affects what they see, so an Editor wouldn’t see links to Settings, Plugins or Appearance.

Let’s say the user just needed access to the Pages section. Go to functions.php. The remove_menu_page function lets you remove things. It accepts the slug of the page you’d like to remove. For example, if you wanted to remove the link to plugins you’d write remove_menu_page( “plugins.php” ). It’s easy to just copy it over from the codex, and commenting out the things they don’t need access to. Note that add_action is using admin_menu, so when the admin menu is loaded, this function is called.

Now, we only see Pages in the menu.

Screen Shot 2014-12-31 at 4.53.40 PM

Screen Shot 2014-12-31 at 4.54.03 PM

Note that this just removes the links, and if someone knew the url they’d still be able to get to that page.

Remember, custom post types often make their own sections as well, so remove those too if you don’t want them appearing.

If the top menu bar is also customizable.

You can use add_menu_page to add links as well, though that takes a bit more knowledge then is covered here.


How to Customize the WordPress Admin Menu with a Plugin

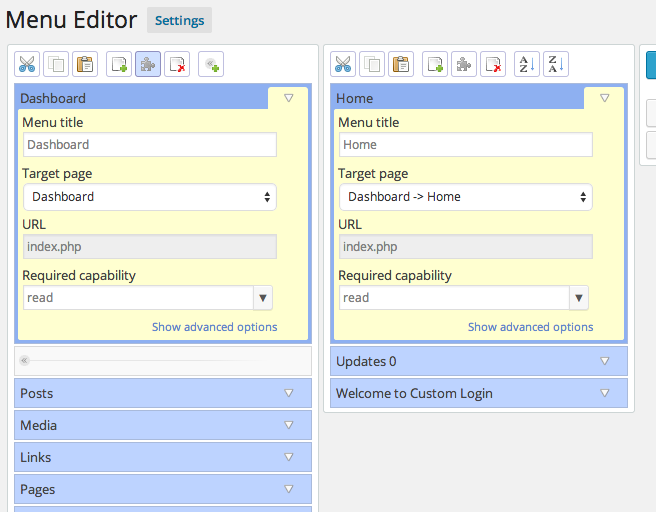
Plugins make this easy. Admin Menu Editor is a good one for this. It also lets you control submenu links. After installing it, you’ll find it under Settings > Menu Editor. Note that there is a pro version, which let’s you set them per user role.

On the left you’ll see your main links, and on the right your sub links, which you can open and edit.

Screen Shot 2014-12-31 at 5.00.52 PM


Custom Dashboard Widgets in WordPress

Custom Dashboard Widgets in WordPress

When a user first signs in, they’re taken to their dashboard page. You can make custom ones, which is helpful if you want to display a custom message to some one as soon as they sign in. This can contain helpful links and contact info.


How to Add Custom WordPress Dashboard Widgets via the functions.php File

You can click Screen Options at the top to toggle widgets on and off. Note that these are customized on a per user basis. There are some global option plugins for this though.

Here is a link to the documentation for the Dashboard Widgets API. You can copy the code here right into your functions.php file. You make one function which contains the main wp_add_dashboard_widget function, which takes some parameters. The first is the slug, the second is the title, and the third is another function which will contain the content. That one is shown below, echoing out a message.

Screen Shot 2014-12-31 at 5.14.13 PM

Screen Shot 2014-12-31 at 5.14.42 PM

It will now appear on your dashboard, and under the Screen Options menu as well. The API documentation also tells you how to remove widget options.


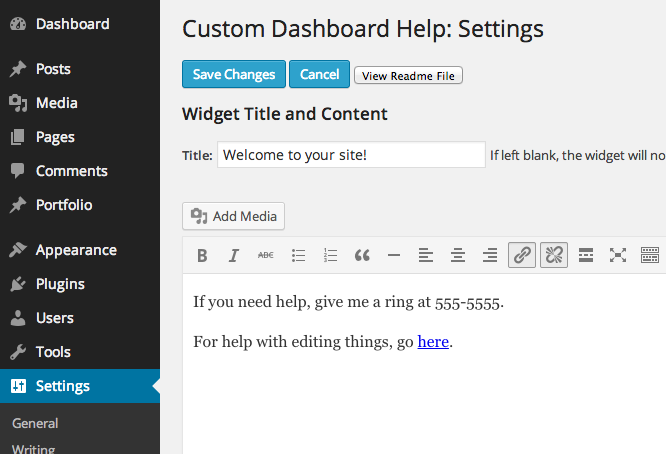
How to Add Custom WordPress Dashboard Widgets via a Plugin

The Custom Dashboard Help Widget plugin is good for this. The premium version lets you set the widgets for all users. Once installed, it’s found under Settings.

Screen Shot 2014-12-31 at 5.19.40 PM


Updating the Footer Text in the Admin Area in WordPress

This is what we’re editing.

Screen Shot 2014-12-31 at 5.20.58 PM

The Custom Admin Footer Text plugin is good for this and will appear under Settings. It basically lets you set what you want for the left and right sides. It allows html, so you can put links in there as well.

Note that you can also do this with code via the functions.php file.

New terms from treehouse – The WordPress Template Hierarchy Part 2 – Archive Templates in WordPress, Custom Post Type Templates in WordPress, and Miscellaneous Templates in WordPress

Archive Templates in WordPress

Archive Templates in WordPress

One archive template can work for a range of different purposes, for blog posts archived by date, author, categories, etc. archive.php is the fallback template for all of these, but you can make custom ones for each type.

Screen Shot 2014-12-29 at 4.58.22 PM

Looking on the left, you can see they’re divided by author, category, custom post, custom taxonomy, date and tag. You have a main template for each (the ones in light blue), as well as more specific ones that use the slug or id method we saw before.


Date Archives

This uses the date.php file. If we look at our blog and are using the archives widget, we’ll see we can click on a certain month.

Screen Shot 2014-12-29 at 5.01.01 PM

The url ends with 201412, and if we remove the month it will show us everything for 2014. Looking at the template you can see that date.php is the main fallback, but we could make a template for year, month and day as well.

In the date.php file we can see a conditional that checks if it is_year, which means a year based archive, and acts accordingly adding the months if it is.

Screen Shot 2014-12-29 at 5.03.53 PM


Category Archives

Uses category.php, but can be more specific and use the slug/id naming method. You can manage your categories under posts > categories. We have the category widget on our blog page, so we’ll see that on the right. We can then make custom templates for each with a slug like category-travel.php or the category id like category-4.php. You can find the cat id by the url on the site, or by editing one.

Screen Shot 2014-12-29 at 5.08.28 PM

Screen Shot 2014-12-29 at 5.09.27 PM

Screen Shot 2014-12-29 at 5.12.25 PM

Note that for the styling, the body_class classes make this a lot easier. For the travel page, the category-travel class is what we’re using for our rules.

Screen Shot 2014-12-29 at 5.12.52 PM


Author Archives

If you click the author’s name on a blog post, it will take you to the author page for that person.

Screen Shot 2014-12-29 at 5.15.01 PM Screen Shot 2014-12-29 at 5.14.56 PM

You can add more users under Admin > Users > Add New. We’ll add one named editor with the Role editor.

In our author.php file we have some custom code to display the name, picture, etc of the author, then a loop to pull in their recent posts. Since this is an author.php page, WP knows to only display posts by that person.

Screen Shot 2014-12-29 at 5.17.54 PM

Now, you can also make a template based off the authors “nicename”, which is their username, or their author id. So, I could do one called author-kyle.php. So, you can make a custom template for each author if you wanted to do that for some reason.


Custom Post Type Templates in WordPress

An Important Review of Custom Post Type Setup

Quick Review:

You’ll need the plugins Custom Post Types UI. Install and activate, then add a new one for portfolio. Click Advanced Options. If you set Has Archive to true, it will automatically use the archive.php or archive-posttype.php page for its archive. If it’s set to false, you can still query out the data and make your own, but WP won’t automatically do it.

For the Rewrite option, this lets WP rewrite the URL’s for custom post types for the archives and permalinks. The Custom Rewrite Slug lets you change the main slug you set at the top to something else, like if you wanted to replace portfolio with work.

We can now add this to our menu by linking to it. The link should be yourdomain/portfolio. Note that you need to make sure you’ve set your permalinks to use the post name rather than the default setting, or this won’t work.

Screen Shot 2014-12-31 at 3.00.22 PMScreen Shot 2014-12-31 at 3.00.26 PM

If we were to edit the archive.php template, we could see the changes on this page now. However, we could get more specific and make a file archive-portfolio.php, and WP would use that template instead.


Custom Post Type Templates Continued

Sometimes if you change a template and refreshing the page doesn’t show the changes it may be a caching issue and you’ll need to either click around or do a hard refresh.

If when setting up our custom post type, if we had the Archive option set to false, we’d get a page not found if we tried to go to the portfolio archive.

Another option is to make your own custom page template, for example page-portfolio.php, where in the comments at the top you’d write its name. The template would contain a WP_Query loop where it would include posts that had the type portfolio. You’d then make a page named portfolio, and set it to that template.

Screen Shot 2014-12-31 at 3.13.34 PMScreen Shot 2014-12-31 at 3.15.05 PM

So, what happens if we have Archive set to true and make a custom page with a template? The custom page will take priority and will be the one displayed. Still, either approach works and it depends on your situation.

Looking at the hierarchy, when you have a single page, and it’s a custom post type you can control it with single-posttype.php, in this case single-portfolio.php. If you don’t have that file, it will default to the single.php template.

Note that there’s a broken link on the single-portfolio.php page for the header element, because it’s link to the page id. Change that to portfolio and it will work.

Screen Shot 2014-12-31 at 3.20.30 PMScreen Shot 2014-12-31 at 3.20.24 PM


Miscellaneous Templates in WordPress

Media Templates

When adding a media file, you’ll see a Link To option on the right, which lets you link directly to the file, and if someone clicks on it, it will take them to a page of just that photo. You can copy the link under it to see. The Attachment Page option lets us set up a special template so the image is displayed surrounding by other content. The Custom option lets you link to anything, and the none is no link.

Screen Shot 2014-12-31 at 3.26.22 PM

We’ll be using attachment page here. When clicked, it will take you to the template for that.

Screen Shot 2014-12-31 at 3.28.34 PM

In the hierarchy, these fall under Single page > Attachment post > mimetypes.

Screen Shot 2014-12-31 at 3.29.26 PM

Mime types are the different types of media files you’ll find on the web. WP has a function get_allowed_mime_types that will show you the ones you can use on your site. We can make templates based off of the mime types, like one for images, one for movies, etc. Note that when looking at the hierarchy, the mime type (like image.php) overrides the subtype (like png.php). If you don’t have any files for a specific mime type though, it will fall back to attachment.php.


Search Templates

The search.php template controls what our search page looks like. To add a search form, you can either add one as a widget, or use the function get_search_form, which displays a search form for you. It does this by loading the the file searchform.php in your template folder. If you don’t have that file, WP will use the default search form.

If you use the search, it will take you to the results page based on the search.php template, and the url will have a query string ?s=yoursearchterm. WP will know what to link to if you use the_permalink as your link.

Screen Shot 2014-12-31 at 3.40.49 PM

Note that you really should include an else block in your loop, for if there are no matching results. Here we give a message and a search form for them.

Screen Shot 2014-12-31 at 3.42.30 PM


404 Pages

The 404.php template displays if the page someone looking for is not found. You should display a message saying so. With 404 pages, you can either have it be entertaining/humorous, or, engaging, as in having it try to help them figure out what they may have done wrong, or list the most popular pages or give them a search bar.