New terms from treehouse – Using PHP with MySQL – Connecting PHP to MySQL, Querying the Database with PHP, Filtering Input for Queries, Using Relationship Tables in MySQL, and Limiting Records in SQL Queries

Connecting PHP to MySQL

Introducing Databases

Most sites store data in a database, like MySQL, then use a server-side language to access it and display it on the site. In this project we’re going to move the shirt data from an array to a db. Commands to access things are called queries.


Installing MAMP

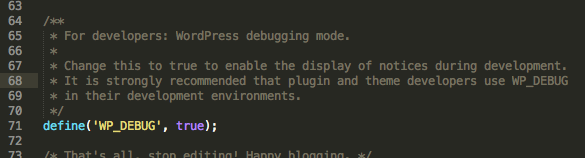
If you have MAMP, you have MySQL. If you go to the start page, you’ll see the info you’ll need later under the MySQL section.

Screen Shot 2014-12-30 at 4.42.36 PM

You can use the web based interface phpMyAdmin for browsing your databases and entering queries.It is also known as a MySQL client. You can view your dbs on the left.


Creating the Products Table

He gave us a file to download. You can see it starts by creating the db, then using it. Then, it creates a table named products, setting the columns for it and their data types and some other parameters, then inserts the needed rows.

Screen Shot 2014-12-30 at 4.47.01 PM

Now, go to phpMyAdmin > SQL (or the SQL button under phpMyAdmin in the top left to open a new window) > paste in everything from the file > Go to execute. You’ll now see the shirt4mike db on the left.

Screen Shot 2014-12-30 at 4.50.23 PM

You can click on it to see the table it contains, and the info within it.

Screen Shot 2014-12-30 at 4.51.16 PM


Introducing Classes

php comes with a native method for connecting with databases called php data objects (PDO). Quick review of objects: Objects are a complex variable type that bundles other variables (properties) and functions (methods) together. -> is used with objects to access those.

In php, a class is a type of object, an object definition. It’s like a blueprint for an object, defining what properties and methods will exist when new objects are created from it. They instantiate their class, maintaining its properties and methods. phpMailer was a class, as is PDO.


Getting Started with PDO

In our project files for shirts4mike, we’ll make a temporary file so we can look at the db. First, we’ll specify a variable name for the object we’re creating from our PDO class. Creating a new object from a class calls a function within that class, so you use parentheses. Like a function you can pass in arguments, and here, you pass in the info needed to connect to the db.

The first is a string to id the db. You specify the type of db then a colon, then host=, then the host you want to connect to, in this case localhost. Then a semicolon, then dbname=, then the name of the database. Next, you specify the port number. If you’re using the default MySQL post or 3306 you won’t need to do this though. Note that MAMP’s default mysql port is 8889.

The second argument is the username, in this case root. The third is the password, also root.

For troubleshooting, we’ll display some info about our new variable to the screen. When loading the page, we can see that it’s an object of the PDO class.

Screen Shot 2014-12-30 at 5.08.38 PM Screen Shot 2014-12-30 at 5.08.32 PM


Handling Exceptions

Any code that connects to an external system should be placed in a block of code that can handle exceptions. In php, that’s a try catch block. You surround the code in a try, and php will try to execute all the code in there. After that you put a catch command, and if there’s an exception php will instead try executing the code in the catch block. When an exception occurs, it’s passed to the catch block as an object. The variable $e will contain details about the exception. So, if there’s an issue we’ll now echo out a message and stop all other code from running.

We’ll also add a message if the connection was successful.

Screen Shot 2014-12-30 at 5.17.19 PM

To test this, we can mess with the arguments we’re passing to PDO.

Screen Shot 2014-12-30 at 5.18.07 PM


Querying the Database with PHP

Querying the Database

Two common lines of code after creating a PDO object are as follows. exec is a method that receives one argument, the SQL command you want to execute as a string. SET NAMES ‘utf8’ defines the character set to be used when sending to and from the db.

The setAttribute method is for when there are errors with PDO. When it can’t connect, we use the catch block, but for things like invalid queries we use setAttribute. It takes two arguments, first being the attribute you want to change, in this case the error mode. The second is the value you want to give that attribute.

Screen Shot 2015-01-02 at 4.56.21 PM

Now for another try/catch block. Remember, these are for when you interact with an external system, and you should have a separate one for each interaction. This one is to run the query that retrieves the products, and the previous one was for connecting to the db. We’ll use the PDO objects query method, which takes one argument, the query you want to run as a string. We’ll put it’s return value into a variable named results, so we can use it later. We’ll use the ORDER BY clause in our statement to set how to sort the results.

We’ll add some echo’s to let us test if it’s successful or not for now.

Screen Shot 2015-01-02 at 5.03.20 PM


Retrieving the Results Set

$results isn’t an array, but a new kind of php object, a PDO statement one. We can see this by var_dumping it. It has one property, the query string used to retrieve it, but many methods which you can read about in the documentation.

Screen Shot 2015-01-02 at 5.14.32 PM

If we read the documentation for the PDOStatement::fetchall method, we can see that it’s a public method, meaning that it can be called from code outside of the object. array means it returns an array. Thee :: between the class and the method means they are related. The square brackets once again mean those things are optional, in this case its arguments.

Screen Shot 2015-01-02 at 5.12.24 PM

We’ll call fetchall on our $results object, and set a pre tag before it so it displays nicely.

Screen Shot 2015-01-02 at 5.15.03 PM Screen Shot 2015-01-02 at 5.15.08 PM


Working With Query Results

Note that in our array each element shows up twice. Once with the associative key, and once with an integer key.

Looking at the documentation again, we can see the parameters fetchAll takes. fetch_style is the first, and we can see the default is to fetch both the column name and the 0 indexed column number, which explains what we’re seeing. We’ll change it to fetch_assoc to get just the column name.

Screen Shot 2015-01-02 at 5.21.13 PM Screen Shot 2015-01-02 at 5.21.07 PM

We’ll need more info from our db for the site though, so we’ll add the other columns to our query string.

Screen Shot 2015-01-02 at 5.23.33 PMScreen Shot 2015-01-02 at 5.23.40 PM

Note that the indices aren’t the same as the sku like the were in our array, but that’s okay because don’t need them to be here.


Modifying Model Code

Since we did a good job with our separation of concerns in the original product, we only need to modify our model code to make it use this db instead.

First we’ll take out the var_dump and instead set our fetchAll to a variable $product.

In our products.php file, we’re currently defining our array in the get_products_all function. We’ll comment out that part, and paste in our db code.

Screen Shot 2015-01-02 at 5.30.55 PM

If we were to look at our home, shirts, or search pages, they all still work fine, which is great. We can test to make sure our site is using the db by messing with our connection string, and checking if the error message we set up displays.


Avoiding Duplication

The database code is going to be used a lot so it’s better to add it as an include file in that folder. We want to check and set up a connection every time we run a query, so we’ll leave that block, but, our queries are going to differ each time, so we can remove the second part.

Screen Shot 2015-01-02 at 5.36.45 PM

We’ll also update our products.php code to include that so we don’t repeat ourselves.

Screen Shot 2015-01-02 at 5.38.51 PM

When you’re working in your local environment, your db credentials will often differ than for your live environment. The best way to handle this is to use your config.php file again and enter them as constants, then use those constants in our database.php include file.

Screen Shot 2015-01-02 at 5.46.14 PM Screen Shot 2015-01-02 at 5.46.08 PM


Filtering Input for Queries

Refactoring Shirt Details

Right now our shirt.php page gets the full list of all shirts and then filters down. This is pretty inefficient, so we’ll refactor this page.

Screen Shot 2015-01-02 at 5.50.20 PM

This code could be needed in other spots later, so we should probably move it to the model. We’ll start by removing the call to get_products_all. Although it doesn’t exist yet, we can also set a variable $product to the return value of a new function that gives us a single product.

The last bit of code has to do with when someone enters a url for a shirt that doesn’t exist, in which we redirect them back to the general shirts page. Before, it would check if the shirt didn’t exist by checking if product was set. However, $product will be set regardless now, because $product is now being set to the return value of get_product_single. Still, in our upcoming model code we can set the return value if no product is found to whatever we want, in this case we’ll do false. We can then use the empty function, which checks if the variable contains an empty value, like a boolean false.

Screen Shot 2015-01-02 at 5.58.24 PM


Using a WHERE Clause

Now to make our get_products_single function, which will receive one argument, the sku. It’s good practice to write the comments for new functions when you create them.

In the function, we’ll start by including the db. We’ll then run a query with a try/catch block, using a WHERE clause. For now, we’ll hard code a number in, like 108. We can then set that to a variable, which will put the returned array into it. We can then set that to $product, which we can use fetch method on (rather then fetchAll, since due to the where clause we only have one row, and fetch grabs the first row). Finally, return $product.

Screen Shot 2015-01-02 at 6.12.06 PM

This now works, though it always brings you to shirt 108.


Understanding SQL Injections

If we were to just put the $sku argument in our SQL query, it would work like this.

Screen Shot 2015-01-02 at 6.13.54 PM

However, someone could in theory add a semicolon then another sql statement and seriously mess with your db. This kind of attack is called a SQL Injection.

Screen Shot 2015-01-02 at 6.14.49 PM

Remember, when dealing with values from outside your code, you want to filter input and escape output (like when we use htmlspecialchars() on our contact form). To filter input here, in shirt.php use the intval function on the $_GET variable, so no matter what someone enters it will be made into a variable. This is also known as sanitizing input, and you should do it as soon as you receive it.

Screen Shot 2015-01-02 at 6.19.08 PM


Preparing SQL Statements

Now, after the controller code on shirts.php receives the id for sku, it passes that to the model code get_product_single. Even though it’s already been sanitized, it’s good practice to sanitize it in both places, because model code might be called from other places that might not be getting filtered.

Back in products.php, we can use PDO’s prepare method, which accepts a query and prepares it to run, without actually running it yet. We’ll replace the query method with that. We’ll then replace the sku value with a ?, which works as an unnamed placeholder.

Next, we want to use our $sku argument within our query. The bindParam method, which connects a variable to a placeholder in a SQL statement. The first argument it takes is a reference to the placeholder. For unnamed ones, you use its number, in this case 1. The second is the variable you want to bind to. These steps protect it from a SQL injection.

Finally, we can use the execute method to run the query, and everything works.

Note that with the fetch method, if a sku can’t be found, there will be no rows in the return and fetch will return a boolean false, which is what we want here.

Screen Shot 2015-01-02 at 6.27.34 PM


Using Relationship Tables in MySQL

Understanding Relationship Tables

We can’t store the shirts’ sizes in our table because a shirt might have more than one, so we’ll put those in a separate table. He gave us that table to download. First is makes a table for the different possible sizes. Note that he has a column named order that will make them easier to list out later. They’re spaced 10 apart in case you need to put a size in between them later.

This and the original table are related in what’s called a many to many relationship. That means one shirt can have multiple sizes, and one size can be used for multiple shirts. To have this work in a db, you need a third table, a relationship table.

Screen Shot 2015-01-03 at 1.50.35 PM

We can see the relationship table is also created in the file.

Screen Shot 2015-01-03 at 1.51.12 PM


Querying Two Tables with JOIN

Add the file’s content to your MySQL database with phpMyAdmin like before, and you’ll see two tables have been added.

If we wanted to query for the sizes for a particular shirt, we could write something like this.

Screen Shot 2015-01-03 at 1.55.48 PM

To join this with another table, we’d use an INNER JOIN table, which will only give us info on sizes in both tables. We’ll also make sure to order them by ascending largeness. Note that he named the column order, which is a reserved name, and if you want to use it you must surround it by back ticks.

Screen Shot 2015-01-03 at 2.00.51 PM Screen Shot 2015-01-03 at 2.00.35 PM


Displaying Shirt Sizes

We now need to add our shirt sizes from the db in the same order they were in the array before. We just had an array element with the sizes, and no associative index, so it must have gone 0,1,2, etc.

Right now this function gives us the shirt details if it found one, and a boolean false if it didn’t. We’ll use a conditional to check for that before having it retrieve the sizes. Note that with a conditional that gives just an early return, apparently you don’t need any curly brackets, though this can make things harder to read.

Screen Shot 2015-01-03 at 2.05.44 PM

First we’ll make an empty array called sizes. Next we’ll query the database for sizes for the shirt, using a try/catch block again. The query is using aliases, and is still a bit long. With php strings, you don’t need to put the whole thing on one line.

Screen Shot 2015-01-03 at 2.13.15 PM


Fetching in a While Loop

fetchAll won’t work for us here, and apparently usually doesn’t. Usually, it’s better to use a while loop and format them as you go. Our while condition is the fetch method that will run so long as there are rows left to run through. When this happens, $row is set to boolean false, and the loop will stop running.

Inside the loop, we’ll add each $row variable to the array. Note that you add elements to array by adding empty square brackets after it. Note that the $row variable will only have one thing in it, the size, as that’s what was specified in our query above. Still, we’ll specify that with square brackets and the column name.

Now, it works!

Screen Shot 2015-01-03 at 2.20.12 PM

Screen Shot 2015-01-03 at 2.20.41 PM


Limiting Records in SQL Queries

Using LIMIT with Descending Order

A lot of our functions are retrieving all the shirts from the db and using php to narrow them down. We should instead improve our queries.

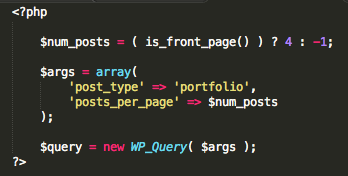
We’ll start with get products recent, which returns the four most recent products, by sku.

Screen Shot 2015-01-03 at 2.25.34 PM

First, we’ll include the db include file. Then, another try/catch block. Since we don’t have any user input, we don’t have to worry about filtering it, and can use query instead of prepare. The query is similar to what we did before, with the difference being that we want to limit it to the four most recent sku’s. First we need to order by the sku column in descending order. Then, we can use the LIMIT keyword to limit this to 4 rows.

Next, we’ll extract our results into an array using the fetchAll method.

Screen Shot 2015-01-03 at 2.30.08 PM


Reversing the Results Set

Right now our function is returning shirts in the opposite order we want. We can do this using the array_reverse() function. Remember, that function returns a reverse copy of the array you pass it, so you must set it equal to a variable. We want to replace our array with this new one, so we’ll set it equal to it.

Screen Shot 2015-01-03 at 2.38.36 PM


Using COUNT

Here we’ll refactor the get_products_count function, which lets us know how many pages of shirts to display.

Screen Shot 2015-01-03 at 2.42.02 PM

Instead, we’ll get the count from MySQL. We’ll include the db file, then add a try/catch block. We can then use the aggregate function COUNT to count how many rows there are in the column sku, and then return that value.

To extract that value, we can use the fetchColumn method, which fetches just a single column. If we var_dump that, we’ll see it’s given to us as a string, because that’s how MySQL gives php data.

Screen Shot 2015-01-03 at 2.46.55 PM Screen Shot 2015-01-03 at 2.46.52 PM

We want that to be an integer, and can convert that with intval().

Screen Shot 2015-01-03 at 2.48.11 PM


Using LIMIT with Offset

Now we’ll refactor the get_product_subset function, which takes in two numbers, the starting and the ending shirt.

Screen Shot 2015-01-03 at 2.50.00 PM

Once again, include the db file and add a try/catch block. We’ll be receiving input, the starting and ending position, so we’ll want to filter that and use the prepare method. If we use two numbers for limit, the first is the offset, and the second is the number of rows. So, LIMIT 10, 4 would offset ten rows, and return rows 11, 12, 13 and 14.

So, we need to modify our starting and ending values. If we want to start at 1, we need the offset to be zero, so we’ll subtract one from whatever $positionStart is. The number of rows equals the ending number minus the starting number plus one. For our bindParam we’ll pass it an additional argument to make sure it treats the result like an integer.

Screen Shot 2015-01-03 at 2.59.59 PM


Using Like

The last function to refactor is the get_products_search one. Right now it uses php to perform the search, but here we’ll make it use SQL instead.

Screen Shot 2015-01-03 at 3.03.56 PM

Once again, include the db file and add a try/catch block. We want a WHERE clause to check for a search term, but we don’t want it to be exact, so we’ll use the LIKE clause and some wildcard characters (%).

Screen Shot 2015-01-03 at 3.06.12 PM

Now, we can’t use bindParam because we need the search term to be surrounded by the wildcards, so we’ll instead use bindValue, which lets you use concatenation.

Screen Shot 2015-01-03 at 3.09.01 PM

New terms from treehouse – WordPress Theme Development Part 2 – Building Out WordPress Navigation, Custom Post Type Templates in WordPress, Adding a Blog to a WordPress Theme, Custom Homepage Templates in WordPress, and Finishing Your WordPress Theme

Building Out WordPress Navigation

The wp_nav_menu Function

The dynamic nav so we can see/use our header wasn’t working due to typos in our functions.php file, but it does now. We’ll now use the wp_nav_menu function to set up the menu. It takes a bunch of parameters that affect how it’s displayed, and what comes before or after it. For this to work though, you must first call the add_theme_support function, and pass it the parameter menus, which adds that as an option under the wordpress admin section under appearance, as that is not default.

Screen Shot 2014-12-22 at 2.09.33 PM Screen Shot 2014-12-22 at 2.09.43 PM

Here, we’ll make a menu called main menu, and add our basic pages.

Screen Shot 2014-12-22 at 2.11.21 PM

Next, we’ll go back to function.php and tell WP we have a specific menu set up. We’ll make a new function and call it register_theme_menus, containing the wordpress function register_nav_menus, which accepts an argument of an array of what menus you want to have on your site. You’d then add_action again, and for the first argument give it init, which means when WP is first run. This will add the Manage Locations tab to the top of the menu’s screen, where you can choose what menu you’d like for each menu location. When you go back to the menu’s page, MAKE SURE TO CHECK THE BOX FOR THEME LOCATION FOR YOUR MENU OR THE STYLES WON’T WORK.

Screen Shot 2014-12-22 at 2.19.41 PM Screen Shot 2014-12-22 at 2.19.10 PM


Coding a Basic Navigation in WordPress

To do this, we’ll go to our header.php file and pop in a php block.

Screen Shot 2014-12-22 at 2.22.16 PM

We’ll start by declaring an array. We’ll turn off the container, which is created by default. Next, we’ll set the theme location of our primary menu, which tells WP that this is where that is. Next, the menu-class parameter lets us assign a class to the first element, in this case our unordered list.

Screen Shot 2014-12-22 at 2.33.57 PMScreen Shot 2014-12-22 at 2.34.04 PM

Now, the admin bar at the top can mess with your styles and make it annoying to access some buttons is they’re near the top. You can go to your header file and add the function body_class() to your opening body tag. This adds a bunch of classes to that tag with info on things like if you’re logged in or not. You could then use these classes to modify your styles for logged in users. This is similar to how modernizr works as a concept.

Screen Shot 2014-12-22 at 2.37.46 PM Screen Shot 2014-12-22 at 2.36.57 PM


Custom Post Type Templates in WordPress

Coding Your Own Custom Post Type Templates

You’ll want to avoid the register_post_type function, because it places the code in your functions.php file, and if someone switches themes, their custom post types won’t be able to be accessed.

So, we’ll instead use the more common approach of using plugins. Like before, we’ll need to install and activate Advanced Custom Fields, and Custom Post Types UI. My first WP blog post covers how to use these, so we won’t cover that again here. Remember to set the rule to equal your new page (portfolio) and to hide the fields you don’t need. After clicking publish, you should now see the portfolio section on the left admin nav.

Screen Shot 2014-12-22 at 2.58.38 PM Screen Shot 2014-12-22 at 3.00.21 PMScreen Shot 2014-12-22 at 3.01.29 PMScreen Shot 2014-12-22 at 3.02.27 PM

You can then add a new post. To have it display though, we’ll need to add a custom template page for it, but first we need to lean about the WP_QUERY function.

Note: like menus, featured images won’t show unless you tell WP to do that. This will add the set featured image option on the admin page for that post type.

Screen Shot 2014-12-22 at 3.08.41 PM Screen Shot 2014-12-22 at 3.08.19 PM


The WP_Query Function

WP_Query is a special function that lets us say what we want a specific loop to display on a page. Its parameters let you cycle through posts with a certain author, tag, or in our case post type. Note that for this you need to create a query object, and then call that for your loop. At the end of the loop, the wp_reset_postdata function resets things and prevents this loop from interfering or interacting negatively with other loops on the page.

Screen Shot 2014-12-22 at 3.12.41 PM


The Portfolio Homepage

To start, we’ll make a copy of our page.php file, saving it as page-portfolio.php. Remember,  we need to add a comment at the top with our template name. We can also remove the else conditional at the end of our loop, as we don’t want that showing up if there are not posts found. We’ll also remove the p tags around the content, as that’s not needed in this case.

Screen Shot 2014-12-22 at 3.16.56 PMScreen Shot 2014-12-22 at 3.17.40 PM Screen Shot 2014-12-22 at 3.17.35 PM

We’ll also remove the p tags around the content, as that’s not needed in this case.

Screen Shot 2014-12-22 at 3.18.56 PM

Now we can edit our Portfolio page and set its template to Portfolio Page instead of default theme.

Screen Shot 2014-12-22 at 3.19.43 PM

Now to set up our WP_Query. First we’ll need the markup we want to loop. Then, above that we’ll create an array called $args that will contain the parameters we want to pass to WP_Query. Then, we’ll create a variable $query and set it to a new WP_Query object.

Now we’ll make our loop, which will be within the section tags but around the div, since that’s what we’re looping. First we’ll check if it has posts of the type portfolio, then add the while loop and what it should do. This is similar to what we had done before. Make sure to close the while and if, and add the wp_reset_postdata(); function to the end of it.

Screen Shot 2014-12-22 at 3.32.03 PM

Now to set up the actually thing to loop. For the link, we’ll use the the_permalink() function, which will know the permalink of the post and take us there. We’ll replace the image with the the_post_thumbnail(); function to use our featured image instead. It accepts a size parameter, in this case we’ll use large. We’ll test it’s working by adding some more portfolio posts and making sure that they show up. It’s looking good!

Screen Shot 2014-12-22 at 3.40.12 PMScreen Shot 2014-12-22 at 3.40.16 PM


The Portfolio Single Page

Now to make a page for the individual portfolio pieces. If we look at the hierarchy, we can see for a single post page, if it’s a custom page, it will use the orange single-$posttype.php, and if that’s not there it will use single.php.

Screen Shot 2014-12-22 at 3.41.35 PM

Now, we want a two column layout, and since we already did that for the contact page, we’ll copy that over and give it the name single-portfolio.php. Since we’re following the naming convention, we can actually remove the comment with the template name at the top. Now, before we just needed our loop in one section, but here, we need it in both so we should expand our loop to surround both sections. We can also remove the else conditional for if no pages are found.

Screen Shot 2014-12-22 at 3.46.13 PMScreen Shot 2014-12-22 at 3.48.30 PM

Now we can call our custom post field images using the the_field tag and passing it images. In the secondary column we can add the_title() and use the_field() function again, this time passing it desccription. Note that the_field() is from the advanced custom fields plugin, and is how you call any of the fields that you’ve set. Make sure that both the if and while statements are closed or the page won’t load.

Screen Shot 2014-12-22 at 3.54.22 PMScreen Shot 2014-12-22 at 3.54.27 PM

However, the images aren’t full size. To fix this, you’d simply edit the post and the images and select full size rather than medium.

Now, we’ll add an enhancement for this page that lets you click to the previous or next piece, or back to the gallery. For the previous and next links you can use the previous_post_link and next_post_link functions. For the link back to the portfolio, a good trick is to use bloginfo(‘url’) followed by the subfolder of the page you want.

Screen Shot 2014-12-22 at 4.00.36 PM Screen Shot 2014-12-22 at 4.00.33 PM


Adding a Blog to a WordPress Theme

Setting Up the Blog Homepage

The main blog listing page is called home.php. Since this is two columns as well, we’ll start by copying the sidebar-left file and naming it home.php. Since we’re using this name, WP will know to use it as the home page for our blog, and we won’t need to to have a comment at the top for its name. Next, we’ll go to our admin section and add a Blog page. Then, go to Appearance > Customize > Static Front Page > Set Front Page to Home and the Post page to Blog > Save and Publish.

Then, under Appearance > Menus add the Blog page to your main menu. Now the blog page will appear in that menu.

Screen Shot 2014-12-22 at 4.11.36 PMScreen Shot 2014-12-22 at 4.12.49 PMScreen Shot 2014-12-22 at 4.13.26 PM

Note that due to what we have written on our home.php file, all its doing is looping through and displaying the header and content of each post, so we’ll need to add some changes.


Coding the Blog Homepage

First we’ll copy the markup framework we want, which will include a link, an excerpt, the featured images and the meta data, and paste it in the loop in home.php.

Screen Shot 2014-12-22 at 4.19.15 PM

First we’ll change the main link to the_permalink, and replace the link content with the_title. In the h2 we can use the_excerpt() function, which is similar to the_content but cuts it off after a certain point.

Then, you need to change/namespace the avatar class on the span in the author link since that is one used by WP. Within that, we replace the image with the get_avatar() function, which takes a few parameters, like the id or email of the user, its size, a fallback image, etc. To get the author’s id, we’ll actually use the get_the_author_meta  function, and pass that the id. The 24 is for the size. Because we’re using a function that starts with get, we need to use echo to print it to the screen, or it won’t appear.

We’ll replace the author’s name with the function the_author_posts_link(), which lets us link to a special author page we’ll build later.  We can replace the link for the category with the the_category function, which will auto create a link for us. It takes an optional parameter for a separator, like a comma or a pipe character for if the post has multiple categories. Below that, we’ll add the date with the_date function.

Within the image container div, we’ll use the_post_thumbnail() function for the featured image, but, within a conditional statement in case the post doesn’t have one. If we simply put the_post_thumbnail() within the conditional check, it will check based on whether or not it exists.

Screen Shot 2014-12-22 at 4.40.47 PM Screen Shot 2014-12-22 at 4.40.43 PM

Now to improve this. We’ll add a featured image to one of our blog posts to make sure this is working. It looks like it does, but if you look at the source you’ll find it’s not using the markup we want. To fix that, use get_the_post_thumbnail instead, as the other option will just echo out the featured image if it’s there, disregarding the markup in the conditional.

Screen Shot 2014-12-22 at 4.44.10 PM

Another issue – the excerpt is putting it in p tags within our h2, which we don’t want. To fix that, we’ll wrap it in the function strip_tags. Additionally, we’ll use get_the_excerpt instead, and echo the whole thing. Now the styles are correctly applied.

Screen Shot 2014-12-22 at 4.47.06 PM

To control how long the excerpt is, we can go into function.php and add a new function, which will accept a parameter of $length. It will return the number of characters we want, 16. Then we’ll use add_filter, which will take excerpt_length, the function we made, and 999. The function is telling wordpress to take it’s variable length, set it to 16. Then the add_filter says to do that for the excerpt_length, and the 999 makes sure that this is called last, so after anything else that may be setting that length.

Screen Shot 2014-12-22 at 4.51.31 PM Screen Shot 2014-12-22 at 4.51.27 PM

So that in looks wonky, and that’s because the_category function is outputting it as an unordered list. To fix that, we’ll simply pass in a comma and space.

Screen Shot 2014-12-22 at 4.53.35 PMScreen Shot 2014-12-22 at 4.53.39 PM

One other issue, the second post isn’t showing the date. The reason for this is that for the_date, if two posts are called in a loop that have the same post date, only the first one called will have that displayed. To fix that, we’ll replace it with the the_time function, with some parameters so it displays a date and not a time.

Screen Shot 2014-12-22 at 4.56.53 PM


The single.php Page

Now we’ll build out what a single blog post page looks like. It looks similar to home.php, so we’ll copy that, and to follow the hierarchy give it the name single.php (you may sometimes see it at single-post.php).

We’ll make some changes, like moving the featured image beneath the h1 and meta data, removing the h2 excerpt, and putting the content beneath the meta data list. Keep in mind when making pages you may need to make compromises or tweaks based on the design or WP’s capabilities.

Screen Shot 2014-12-22 at 5.19.55 PM Screen Shot 2014-12-22 at 5.19.03 PM


Adding Comments to a Template

The comments_template() function lets you do this, and takes some optional parameters like the file you’re loading, and whether to separate them by comment type. Simply add it in and it works! If you’re signed into WP, it just has a textarea, but if you’re not, it will have some additional fields for you to fill out.

Screen Shot 2014-12-22 at 5.23.36 PM Screen Shot 2014-12-22 at 5.23.20 PM Screen Shot 2014-12-22 at 5.22.59 PM

Under Admin > Settings > Discussion you can customize how they work for the site.

To create a custom comment section, create a new file name comments.php, and WP will auto use that instead. The details of doing that won’t be covered here, but you can go to a template that has a good, custom set up and read their comments.php file to get started.


A Catch All Archives Page

If you have a archive.php file, it will automatically control archives for author pages, custom post types, categories, tags, etc. You can make a custom page template for each type, but the general archive.php template should be good for all of them.

We’ll copy our home.php file and name it archive.php. We’ll then add a div with the class leader, and in an h1 use wp_title(”) with Blog Posts. Now, when someone clicks on one of the meta data links, it will load the archive of all relevant blog posts with the applicable title at the top.

Screen Shot 2014-12-22 at 5.32.09 PM Screen Shot 2014-12-22 at 5.30.53 PM Screen Shot 2014-12-22 at 5.30.49 PM


Custom Homepage Templates in WordPress

A Static Homepage Template

You have two options for home pages in WP, a static page, or a latest blog posts page. If you look in the hierarchy, you’ll find we need a page named front-page.php. We’ll remove the else text for if there are no posts, If you name it that way, it will automatically be set to the home page, so long as under Appearance > Customize > Static Front Page > Front Page is set to Home.

We want to have the loop on our portfolio page here, but rather than copy and paste it (which is poor practice), will create an include file for it. We’ll name it content-portfolio.php, which is a naming convention for includes that involve content. To then include that file, you’d use the get_template_part() function, which is basically a php include statement, with the addition for WP that it takes two parameters, which are slugs of the url. So for content-portfolio.php, you’d pass it ‘content’ and ‘portfolio’. We’ll paste that in the portfolio and front-page.php files.

Screen Shot 2014-12-22 at 5.49.53 PMScreen Shot 2014-12-22 at 5.49.58 PM

To have less posts show on the home page, while have all show on the portfolio page, we can use a pagination parameter for WP_Query called posts_per_page. If you put -1 it will show all posts, and if you put a number it will show that many. We’ll do this with wordpress conditional tags, in this case the is_front_page() one.

Screen Shot 2014-12-22 at 5.55.16 PM

Note that this can also be written this way, which we’ll do here. 

Screen Shot 2014-12-22 at 5.55.19 PM

Finally, we need to add another element to the $args array we’re passing to our WP_Query object.

Screen Shot 2014-12-22 at 6.02.48 PM


A Blog Listing Homepage

If under Appearance > Customize > Static Front Page > you instead choose Your latest posts, you’ll find it doesn’t work right. Upon reviewing the hierarchy, while for static pages you should use front-page.php, for your latest posts you should just use home.php (which is your blog listing page). If you have a front-page.php file in there though, it will use that, so rename it to something else instead and it will use home.php.

Another way to get around this is to edit your pages in the admin section and select a specific template for each. Be sure to test your template in different kinds of content to make sure it works if you plan on releasing it for others to use.


Finishing Your WordPress Theme

Adding Widget Areas to a WordPress Theme

We’ll stat by going to the functions.php file and creating a new function call wpt_create_widget (remember the wpt is for namespacing), and within that use the register_sidebar function, which accepts an array. We’ll then call that function twice below, passing in the three parameters need for name, id and description.

Screen Shot 2014-12-27 at 12.53.30 PM

Now, a widget section appears under the Appearance section. Note how its name and description appears. You can drag and drop the widgets into the sections you want.

Screen Shot 2014-12-27 at 12.55.42 PM

Now, we need to go to our template and ensure the right code is there for the widgets. We’ll go to any template file that has the sidebar, like archive.php, copy paste that into an include, and use that instead. The file name you should use is sidebar.php. We can then use the get_siderbar function, which will automatically pull that in.

Screen Shot 2014-12-27 at 1.01.39 PM Screen Shot 2014-12-27 at 1.03.03 PM

You’d then go through and replace anywhere else you need the sidebar with that, like home.php and single.php. However, for the page-sidebar file, we want to use a different sidebar file, which you can do by passing get_sidebar a parameter. If you pass it page, it will use the file sidebar-page.php. Here, we’ll add a conditional that checks if it’s there’s not any widgets installed using the dynamic_sidebar function, and if there’s not to display a message to install them. If there are, it will simply display them.

Screen Shot 2014-12-27 at 1.44.40 PM Screen Shot 2014-12-27 at 1.44.28 PMScreen Shot 2014-12-27 at 1.12.10 PMScreen Shot 2014-12-27 at 1.44.48 PM

We’ll also want to copy that code over to sidebar.php, and change it so it works for our blog page.

Screen Shot 2014-12-27 at 1.46.38 PM

Note that if we use the search widget, and don’t have a search.php template file, it will use the default template, which is index.php.


Adding Shortcodes to your Theme

While you can add html to your wordpress pages and posts under the edit sections, a better way to do this is shortcodes. The Easy Foundation Shortcodes plug in adds formatting buttons to the WYSIWYG editor. You could code this into your theme, but once again a plugin is better because you can change themes and maintain the formatting.

Screen Shot 2014-12-27 at 1.54.07 PM

You can now add buttons, columns, whatever you need.


Testing your WordPress Theme

1. Make sure all the pages/links/features (like comments) work. Make sure the titles

One issue we have is on the about page the title is just saying about, and not the name of the site. We can add that with bloginfo(‘name’), and also add some parameters to the_title. ‘|’ is the separator, true is that we want it to echo, and ‘right’ to have it display on the right side.

Screen Shot 2014-12-27 at 1.58.59 PM Screen Shot 2014-12-27 at 1.57.21 PM

2. Go through site with debug mode on. If you go to your main wp install > wp-config.php file. Then, scroll down to WP_DEBUG, and set it to true.

Screen Shot 2014-12-27 at 2.02.16 PM

Now, if we make an error in our code (like a : instead of a ;), and try loading the page, we’ll get an error message saying where the problem is. If debug mode is off it’d just give you a blank page. Don’t turn this on when the site is live, but this is good to have it on when developing.

3. The Theme Development Checklist lists three main things to check.

3a. The Theme Development page gives a great overview of everything you need to know when making a theme.

3b. The Theme Unit Test is a bunch of data you can download and install into your theme. It’s generic content that includes all the default stuff you could have like pictures, lists, etc, and you can see how your theme handles it. If your theme is specialized, this may be overkill.

3c. The Theme Review is the guide WP gives for you to follow if you want to submit your theme to the repository.

The Theme-Check plugin helps with this, it goes through your theme and sees if it meets those standards. It appears under Appearance > Theme Check. You will need WP_DEBUG enabled.

If we test our theme, we get a bunch of errors.

Screen Shot 2014-12-27 at 2.12.52 PM

One is that WP has certain set css classes it uses, like wp-caption when it works with images. An easy way to get these classes for your theme is to go into the stylesheet for a default WP theme like twentyfourteen, find the needed rules, and copy them into your css. Note that some class, like .wp-caption may be used for many rules.

The text domain problems listed may be from code copied from the codex, where we didn’t include a second parameter for the language file, which is for translating to other languages. Here’s that corrected. You’d want to do this for each error.

Screen Shot 2014-12-27 at 2.17.59 PM

It doesn’t like our flexible width tag, which can be found in the comments section at the top of the style.css file, and replace it with fluid-width.

Another issue is our lack of pagination code. You can look a loop up in the codex for that. If you’re testing this code make sure you have enough blog posts that it will appear, and that under Settings > Reading you’ve set how many blog posts per page to appear.

Screen Shot 2014-12-27 at 2.21.54 PM

The post_class() function is similar to the body_class one in that you add it to the div containing your posts, and it will add classes to it that may be helpful for you reference later. You can pass it parameters of other classes you want it to add, like post.

Screen Shot 2014-12-27 at 2.25.16 PMScreen Shot 2014-12-27 at 2.25.27 PM